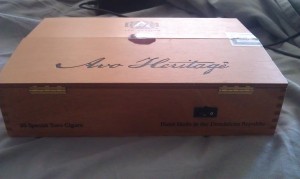
It is kind of weird sometimes how plans go into motion. Walking past a cigar shop in the area I noticed that they were selling empty cigar boxes for cheap and the idea occurred to me, “Why not make a stir plate out of one?” I’m not by any means finished with my project, but so far the only things I’ve needed to buy were a T-8 Torx screwdriver and the cigar box. Everything else I’ve re-purposed from things I had laying around.
A stir plate can be an extremely useful tool in saving money and in making better beer. A normal Wyeast smack pack or other yeast manufacturers’ equivalent is made for pitching into 5 gallons of wort at about 1.048 SG according to this. Using two smack packs or vials of yeast for high starting gravity worts is a fine practice, but why purchase two if you can just make a yeast starter and get the same results?
The parts I’m using here include:
- Cigar box
- Computer Fan
- Hard Drive Magnet
- Insides of an external Hard Drive
- Hard Drive Power Adapter
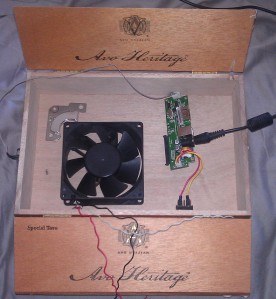
I had an old computer case and a broken external HD sitting around and I remember reading somewhere about using these types of parts to make a functional stir plate for yeast starters. I’ll be using the picture above as a reference as I try to explain how to put this thing together. The first step for me was to remove the case fan from the old computer and spread out the wiring. My fan has three wires, but only two are necessary for this (in my case it is the black and red wires but I don’t believe all fans are the same). The fan isn’t going to be used for blowing air anywhere but instead as the spinning part of our stir plate.
In the upper left corner of the cigar box pictured, you can see a shiny metal thing. That is a magnet that was taken out of an old hard drive. This magnet is very strong and will be great for this project. Getting the magnet out of the HD is probably the toughest part of the project so far and the most expensive. The broken HD I had needed to be opened using a T8 Torx screwdriver. I got a whole set of these at a hardware store for around 6 dollars. After unscrewing all the safety screws on the lid (there is usually at least one hiding under a label), I pried open the HD lid with a flat head screwdriver and extracted the two rare earth magnets inside. These magnets can be found near the base of the arm that reads/writes onto the platters. Opening a working HD will break it, so do not do this with a hard drive you plan on using again. Once you’ve extracted the plates the magnets are attached to, it is probably best to remove the magnets from the piece of metal. Guides online suggest using clamps to bend the metal to remove the magnet. It is possible for these magnets to break and keep the magnets away from any working electronics.
Finally, in the picture above there is a small circuit board and switch that I extracted out of the external hard drive case. This is just me being lazy in order to re-purpose the on/off switch and LED light attached. Obviously you’ll need to find some way of getting power to the fan to get it to spin the magnet. I tested the fan directly connecting it to the 12v 2 amp power adapter that came with the HD and it worked fine as far as I can tell. Doing a direct connection would be simpler and plugging/unplugging would be the means of turning it on and off.
keeping the enclosure stable is probably one of the most important things in the build. The magnet needs to be mounted on top of the spinning part of the fan as close to the middle as possible. The more balanced the magnet is on top of the fan, the less wobbling that will occur while it is running. A bit of wobble is going to be something that can’t be avoided using these parts, but as long as you keep it to a minimum it shouldn’t be a cause for too much concern.
Once you have the magnet securely fastened to the fan, mount the fan to the bottom of the box. You might need to adjust the height level by adding some washers or such in order to get the magnet close to the top of the box. You could also mount the fan to the top of the box as long as there was enough room for the fan and magnet to spin.
I can’t really give any results right now as I’m not quite finished with this project (and really don’t have much use for a stir plate right now as I usually make 3 gallon batches) but so far everything seems to be working well. Anyone else have stories of DIY brewing projects to share? I could always use more ideas.
Related articles
- Building a stir plate (andymakesbeer.wordpress.com)

